Repotting a Juniper bonsai at the right time can make a big difference in its health and growth. It helps prevent root problems, keeps the tree strong, and allows fresh soil to support healthy development. But many bonsai growers aren’t sure when the best time to repot really is.
This seasonal guide explains why, when, and how to repot your Juniper bonsai safely. Whether you’re a beginner or simply want to avoid common repotting mistakes, this article breaks everything down clearly, so your bonsai thrives year after year.
Why Repotting Is Important for Juniper Bonsai
Repotting is not just about changing soil. It’s about giving your Juniper bonsai a fresh start. Over time, the soil becomes compact and loses its nutrients. Roots can also grow too thick and tight inside the pot, leaving no room for water or air to move properly.
When you repot, you give the tree a chance to breathe. You also check the roots, trim the unhealthy ones, and add fresh soil that holds the right moisture. This helps your bonsai stay strong, absorb nutrients better, and grow in a healthy shape.
Without regular repotting, a Juniper bonsai can become weak, dry, or even die. That’s why repotting is a key part of long-term juniper bonsai care.
How to Know When Your Bonsai Needs Repotting
Knowing when to repot a Juniper bonsai is important. You don’t want to do it too often, but you also shouldn’t wait too long. Most healthy bonsai trees need repotting every 2 to 3 years, but it depends on the age and size of the tree.
Here are some clear signs that your Juniper bonsai may need repotting:
- Roots growing out of the drainage holes: This shows the roots have no space left.
- Water drains too slowly or not at all: Old soil may be too dense or broken down.
- Tree is loose in the pot: It may be root-bound and can’t stay stable.
- Leaves turning dull or weak: The roots may not be absorbing nutrients well.
- Soil dries out very fast: The root system may have taken up too much space.
If you notice one or more of these signs, it may be time to prepare for a repot during the right season.
Best Season to Repot Juniper Bonsai
The best time to repot a Juniper bonsai is in early spring. This is when the tree is just starting to wake up from its winter rest but hasn’t begun strong growth yet. At this stage, the tree is less stressed and can heal faster after the roots are trimmed.
In most regions, early spring means repotting between late February and early April. The exact timing depends on your local climate. Look for signs like buds starting to swell but not fully opening yet.
Avoid repotting in summer or winter. Summer heat can cause shock after root cutting, while winter slows down recovery. Autumn may seem safe, but the tree won’t have enough time to regrow its roots before cold weather sets in.
Spring gives the tree a full growing season to build strong roots. That’s why it’s the safest and healthiest time to repot your Juniper bonsai.
Step-by-Step Repotting Process for Juniper Bonsai
Repotting a Juniper bonsai may sound tricky, but it’s easy if you follow the right steps. Make sure you have your tools ready and work gently to avoid stressing the tree. Here’s a clear guide to help you repot safely.
1. Prepare Your Tools and Materials
Gather everything before you begin. You’ll need pruning scissors, a root rake, wire cutters, fresh bonsai soil, a mesh screen, and a new or cleaned pot. Choose a pot with good drainage holes.
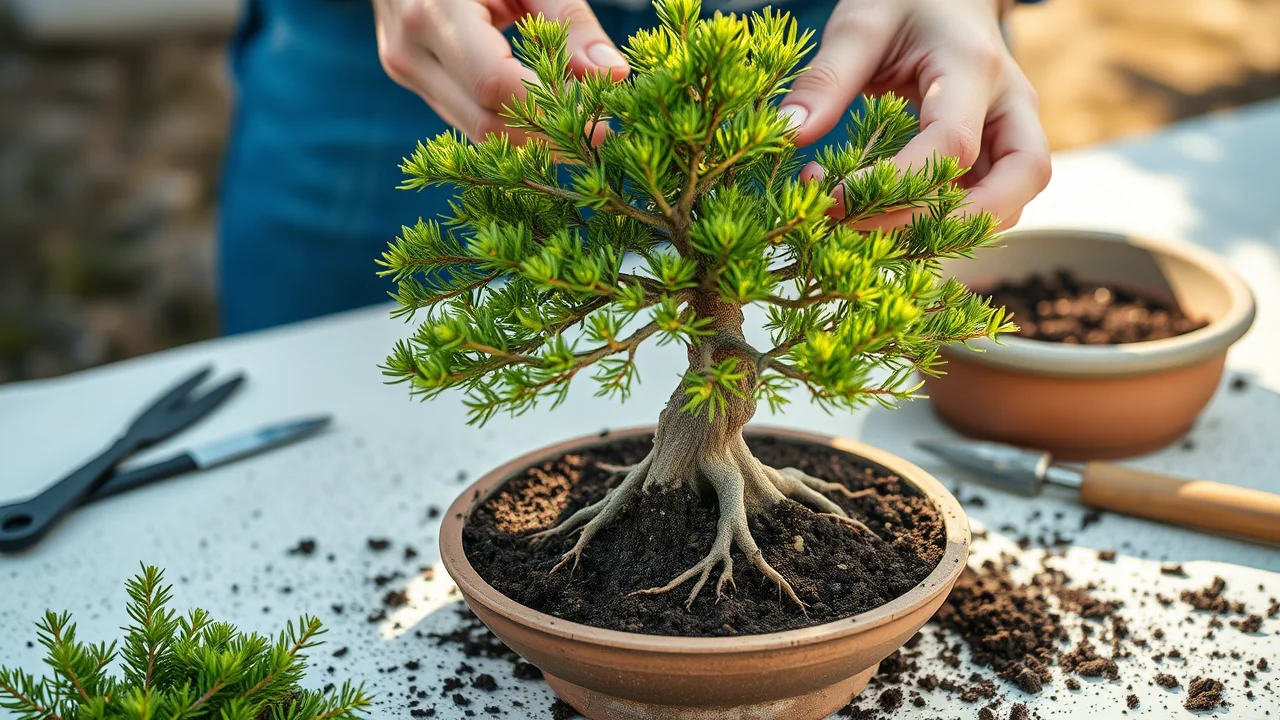
2. Remove the Tree from Its Pot
Turn the pot sideways and gently tap the sides to loosen the soil. Hold the tree near the base and lift it out slowly. If it’s stuck, use a root hook or chopstick to loosen the edges.
3. Check and Clean the Roots
Use a root rake or chopstick to remove old soil from the roots. Be careful not to break fine roots. Check for any black, mushy, or dead roots and trim them off with clean scissors.
4. Trim the Roots Carefully
Trim no more than one-third of the root mass. Cut evenly around the edges to encourage healthy new root growth. Always use sharp, sterilized scissors for clean cuts.
5. Add Mesh and Fresh Soil to the New Pot
Place mesh over the drainage holes to stop soil from falling out. Add a thin layer of fresh bonsai soil at the bottom. Make a small mound in the center to help spread the roots evenly.
6. Place the Tree in the New Pot
Position the tree slightly off-center for a natural look. Spread the roots gently over the soil mound. Use bonsai wire if needed to anchor the tree in place so it doesn’t wobble.
7. Fill with Soil and Remove Air Pockets
Add soil around the roots little by little. Use a chopstick to push soil between the roots and remove air pockets. Gently tap the pot to help the soil settle.
8. Water the Tree Thoroughly
After repotting, water the tree well until water flows out from the bottom. This helps settle the soil and gives the roots moisture to start recovery.
9. Place in a Sheltered Spot
Keep the bonsai in a bright but shaded place for the first two weeks. Avoid direct sunlight, wind, or heavy rain while the tree adjusts to its new pot.
Aftercare Tips for a Recently Repotted Bonsai
After repotting your Juniper bonsai, proper care is important to help it recover. The tree needs time to adjust and grow new roots. Giving it the right conditions during this stage can prevent stress and damage.
Here are simple aftercare tips to follow:
- Keep it out of direct sunlight: Place the tree in a bright spot with filtered light for the first two weeks.
- Avoid fertilizing right away: Wait at least 4 weeks before adding fertilizer. New roots are still growing and may burn if fed too soon.
- Water gently and regularly: Keep the soil moist but not soggy. Don’t let it dry out completely. If you’re unsure about timing or frequency, this guide on how often to water Juniper bonsai breaks it down clearly.
- Protect from strong wind or rain: Wind can shake the tree and damage roots. Heavy rain may wash away fresh soil.
- Do not prune or shape: Let the tree rest. Avoid wiring or trimming branches during recovery time.
These care steps help your Juniper bonsai stay strong and adapt well after being repotted.
Common Repotting Mistakes to Avoid
Even careful bonsai lovers can make mistakes during repotting. Knowing what to avoid can save your Juniper bonsai from stress or long-term harm.
Here are the most common repotting mistakes:
- Repotting at the wrong time: Doing it in summer or winter can harm the tree. Early spring is safest.
- Cutting too many roots: Removing more than one-third of the roots can shock the tree and slow recovery.
- Using poor-quality soil: Soil that holds too much water or lacks air can cause root rot. Always use well-draining bonsai soil.
- Not securing the tree: If the tree is loose, it won’t grow stable roots. Use bonsai wire to hold it in place.
- Skipping aftercare: Sunburn, dryness, or overwatering can quickly affect a weak tree. Always give it a calm, stable space to recover.
Avoiding these errors will help your bonsai stay healthy and grow stronger after each repot.
Conclusion
Repotting a Juniper bonsai at the right time and in the right way is key to keeping it healthy. Early spring is the best season because the tree can grow new roots and adjust before the heat of summer. With careful steps and gentle aftercare, your bonsai will recover well and stay strong.
Pay attention to signs that your tree needs repotting, avoid common mistakes, and give it time to rest afterward. These simple actions can make a big difference in how your bonsai looks and grows over the years.
If you found this guide helpful, please share it with others or check out more bonsai care tips.
FAQs
Here are some common questions people ask about repotting Juniper bonsai trees:
How often should I repot my Juniper bonsai?
Most Juniper bonsai trees need repotting every 2 to 3 years. Younger trees may grow faster and need it more often. Older trees can go longer if the roots are healthy and the soil drains well.
Can I repot a Juniper bonsai in summer?
It’s not a good idea. Summer heat can stress the tree after root work. Early spring is the best time because the tree is just starting to grow and can recover more easily.
What type of soil should I use for repotting?
Use bonsai soil that drains well and allows air to reach the roots. A good mix includes pumice, lava rock, and akadama. Avoid using garden soil or potting mix—they hold too much water.
Is it okay to fertilize right after repotting?
Wait at least 4 weeks before adding fertilizer. The roots are still healing, and feeding too soon can burn them or cause stress. Start feeding once you see new growth.
Should I prune the tree when I repot it?
No. It’s best to avoid pruning the branches right after repotting. Let the tree rest and focus on growing new roots before doing any styling or trimming.